Long Hexagon Tray
Wow it has been a super busy week, boy am I glad it is Saturday!
Today I am going to share my Long Hexagon Tray with you... and I am not going to lie, I seriously love this thing.
Trays = Happiness :)
I am also sharing this over at Remodelaholic: click here to check it out!
Supplies:
2- 1'' x 2'' x 8' boards
Satin or paint
Sand paper
Wood glue
Nail gun and finish nails
Bar clamps
Miter Saw
Step 1: After making your cuts glue and clamp tray bottom pieces together
Glue your bottom boards together with wood glue and then clamp them using bar clamps while the wood dries. You can wipe off the extra glue with a damp rag after you clamp. If you are staining make sure to do this, because dried on glue does not take the stain.
Once the glue is dry remove the clamps and sand the tray bottom smooth.
Step 2: Measure and Cut your Tray Sides and attach them to the tray bottom
You can use the measurements in the cut list or you can measure and mark your tray sides to your bottom tray piece (after it is glued together) as you go. I prefer this method to ensure a good fit.
I like to mark and cut as I go, it is up to you. Your short ends should line up with the ends of the tray bottom.
Once you have one of the short pieces cut you can use it to cut the other three to the same size. I set the cut board on top and make sure the ends are flush (top left), then I mark the board to be cut on the other side (top right). In the bottom photo you can see I place the blade right on the edge of my marked line and cut.
Then I cut the long sides the same way. I always double check to make sure they fit to my tray bottom by placing them around it.
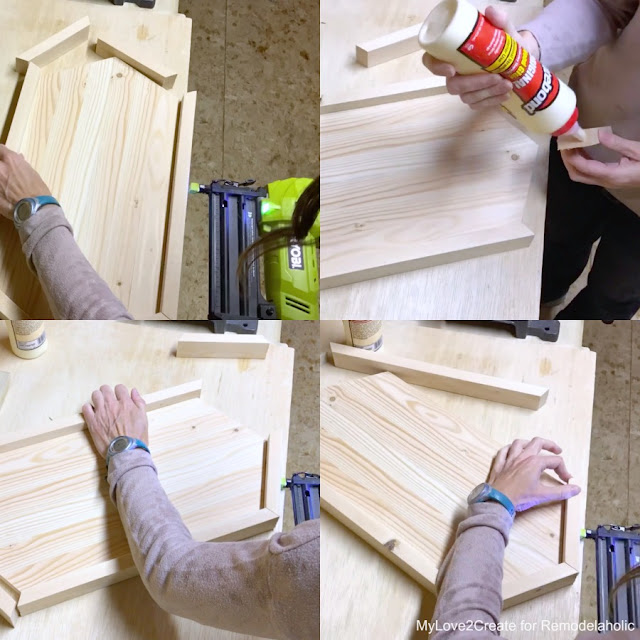
Step 3: Attach tray sides to the bottom.
Using wood glue attach each tray side one at a time and work your way around until all pieces are in place.
Nail through the lower half of the sides into the tray bottom with 2'' finish nails. Once you have attached all the sides, go back with 1 1/4'' finish nails and secure the mitered corners on each side for extra strength.
You can check out my Triangle Hexagon Tray for even more tips and tricks on building!
Step 4: Finish and Enjoy!
Fill all holes with wood filler, sand smooth, and stain or paint your tray as you desire!
I use a pre-wood conditioner before I stain on soft woods like pine. Then I stained my tray with Rustoleum's Kona. I had started with a lighter stain, but didn't love it so I finished it off with the dark and it was just what I wanted!
I ended with 3 coats of poly sanding with 320 grit between coats 1 and 2 to make it nice and smooth.
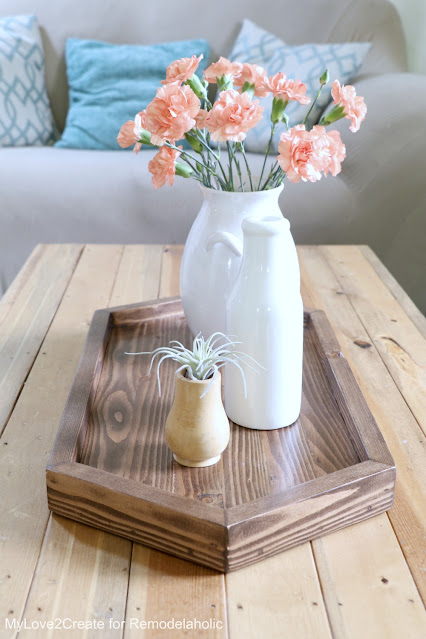
This tray is so pretty and unique and it adds such charm to any space.
Plus could be used in any room in the house. A perfect decor accent or place to keep things organized.
It would look so great on dresser to catch your jewelry at night.Or put it in the kitchen for holding flowers!
It also looks great in the living room sitting on my Reclaimed Wood Coffee Table!
Plus it would be a great place to hold remotes, if you are prone to loosing them.
It would also look great in the bathroom holding lotions and soaps! So many ideas!
Click here to purchase and download the Long Hexagon Tray Plans.
This tray can be used in so many different ways in the home, what would you use it for?


1 comments
Mindi! You rock the angles again! I love your hexagon tray.
ReplyDeletegail
Your comments make me smile! I love to hear what you think!